Loading
Decorative background pattern

Setup Guide

Get your WebScreen up and running in just a few minutes!

Choose Your Setup Method

We offer two ways to get your WebScreen up and running. Choose the one that works best for you.

1 Prepare Your Hardware

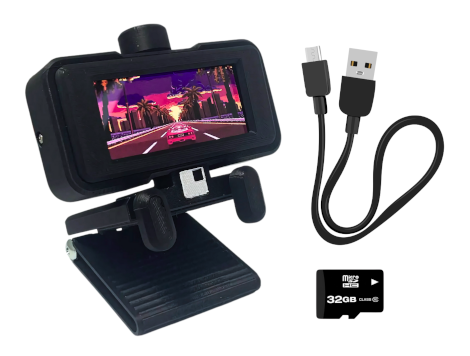
Before we begin, make sure you have:

  • WebScreen device
  • USB-C cable for power and data
  • MicroSD card (formatted as FAT32)
  • Computer with Chrome or Edge browser
WebScreen device with USB-C cable and accessories for setup

2 Flash the Firmware

Connect Your WebScreen

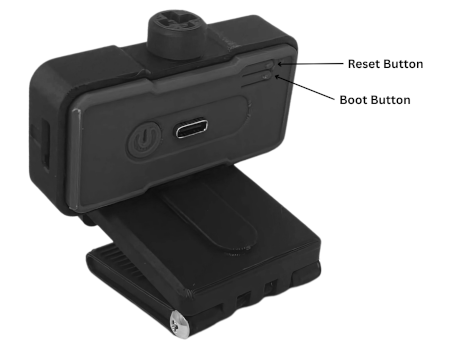
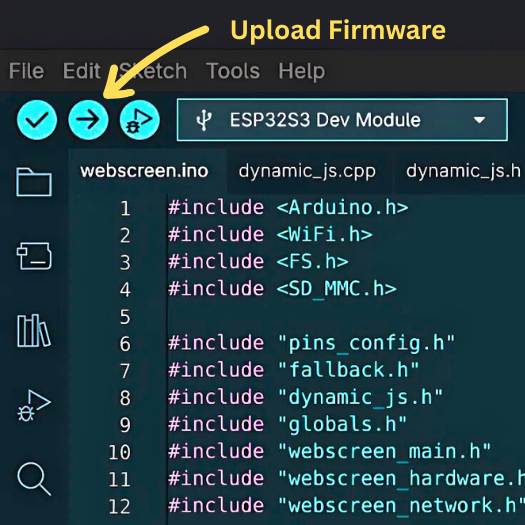
Connect your WebScreen to your computer using the USB-C cable.

Enter Upload Mode
  1. Hold the BOOT button
  2. Press RESET once
  3. Release BOOT
WebScreen device showing BOOT and RESET button locations for firmware flashing

3 Use the Web Flasher

  1. Open the Web Flasher in Chrome or Edge browser
  2. Click "Connect" and select your WebScreen device from the list
  3. Choose the latest firmware version
  4. Click "Flash" and wait for the process to complete

4 Prepare the SD Card

Insert the SD Card

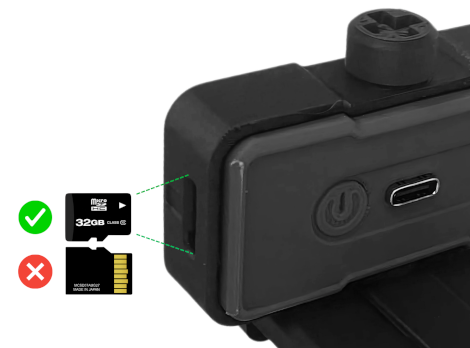
Insert your FAT32-formatted microSD card into the SD card slot on your WebScreen.

WebScreen device with microSD card slot highlighted for storage expansion
Create Configuration File

Create a file named webscreen.json on your SD card:

{ "settings": { "wifi": { "ssid": "YourWiFiName", "pass": "YourWiFiPassword" } }, "screen": { "background": "#2980b9", "foreground": "#00fff1" }, "script": "app.js" }
Replace "YourWiFiName" and "YourWiFiPassword" with your actual WiFi credentials.

5 Reset and Test

Start Your WebScreen
  1. Press the RESET button or reconnect power
  2. WebScreen will boot and connect to your WiFi
  3. The screen should display the default notification app
WebScreen device running with AMOLED display showing interface and animations
Congratulations! Your WebScreen is now set up and ready to use!

1 Install Arduino IDE

  1. Download and install Arduino IDE 2.0+
  2. Open Arduino IDE and go to File → Preferences
  3. Add ESP32 board manager URL:
    https://raw.githubusercontent.com/espressif/arduino-esp32/gh-pages/package_esp32_index.json
  4. Go to Tools → Board Manager, search for "ESP32" and install version 2.0.3+

2 Install Required Libraries

Open Library Manager and install:

  • ArduinoJson by Benoit Blanchon (v6.x or later)
  • LVGL by kisvegabor (v8.3.X)
  • PubSubClient by Nick O'Leary (v2.8 or later)
Configure LVGL

Copy the provided lv_conf.h file to your Arduino libraries folder:

cp WebScreen-Software/lv_conf.h ~/Arduino/libraries/

3 Configure Board Settings

In Arduino IDE, configure these settings under Tools menu:

  • Board: ESP32S3 Dev Module
  • Port: /dev/ttyACM0
  • USB CDC On Boot: Enabled
  • CPU Frequency: 240MHz (WiFi)
  • Core Debug Level: None
  • USB DFU On Boot: Disabled
  • Erase All Flash Before Sketch Upload: Disabled
  • Events Run On: Core 1
  • Flash Mode: QIO 80MHz
  • Flash Size: 16MB (128Mb)
  • JTAG Adapter: Disabled
  • Arduino Runs On: Core 1
  • USB Firmware MSC On Boot: Disabled
  • Partition Scheme: 16M Flash (3MB APP/9.9MB FATFS)
  • PSRAM: OPI PSRAM
  • Upload Mode: UART / Hardware CDC
  • Upload Speed: 921600
  • USB Mode: Hardware CDC and JTAG

4 Upload the Firmware

  1. Clone the WebScreen repo: git clone [email protected]:HW-Lab-Hardware-Design-Agency/WebScreen-Software.git
  2. Open the sketch: File → Open → webscreen/webscreen.ino
  3. Enter upload mode:
    • Hold the BOOT button
    • Press RESET once
    • Release BOOT
  4. On Linux you may need to update the port permissions, eg: sudo chmod 666 /dev/ttyACM0
  5. Click the Upload button in Arduino IDE
  6. Wait for upload to complete
  7. Press RESET to start WebScreen
Arduino IDE showing firmware upload process to WebScreen device

Advanced Configuration

Customize your WebScreen experience with these advanced options

Basic WiFi Setup
{ "settings": { "wifi": { "ssid": "MyNetwork", "pass": "MyPassword" } }, "script": "app.js" }
{ "settings": { "wifi": { "ssid": "MyNetwork", "pass": "MyPassword" } }, "screen": { "background": "#1a1a2e", "foreground": "#eee" }, "script": "weather.js" }
{ "settings": { "wifi": { "ssid": "MyNetwork", "pass": "MyPassword" }, "mqtt": { "enabled": true } }, "script": "mqtt_dashboard.js" }
Core Serial Commands
/help - Show all commands /stats - Display system stats /info - Show device info /write <file> - JavaScript editor /load <script.js> - Switch JS app /reboot - Restart device
/ls [path] - List files /cat <file> - Display file /rm <file> - Delete file /wget <url> [file] - Download file
/ping <host> - Test connectivity /monitor [cpu|mem|net] - Live monitoring /config get <key> - Get config value /config set <key> <val> - Set config

Troubleshooting

Common issues and their solutions

Device not detected by Web Flasher
  • Make sure you're using Chrome or Edge browser
  • Try a different USB-C cable (some are power-only)
  • Enter upload mode manually using BOOT and RESET buttons
  • Check if drivers are installed (Windows may need CP2102 drivers)
  • Double-check your WiFi credentials in webscreen.json
  • Ensure your WiFi is 2.4GHz (5GHz not supported)
  • Check if your WiFi password contains special characters that need escaping
  • Verify the SD card is formatted as FAT32
  • Check if the SD card is properly inserted
  • Verify webscreen.json file syntax is valid JSON
  • Connect via serial monitor to see error messages
  • Try re-flashing the firmware
  • Ensure the script file name in webscreen.json matches the actual file on SD card
  • Check if the JavaScript file has syntax errors
  • Verify the SD card is readable (try different card if needed)
  • Use serial monitor to see detailed error messages

What's Next?

Now that your WebScreen is set up, explore these resources to get the most out of it

Write JavaScript Apps

Use our Serial IDE to create custom Javascript apps.

Join the Community

Share projects and get help from other WebScreen users

Explore Examples

Learn from working code and example applications